Work on Records in the Case View/Case Table
Applies To: Eclipse SE
In this article
1. Select a Record in the Grid
4. View Field Content in a Cell
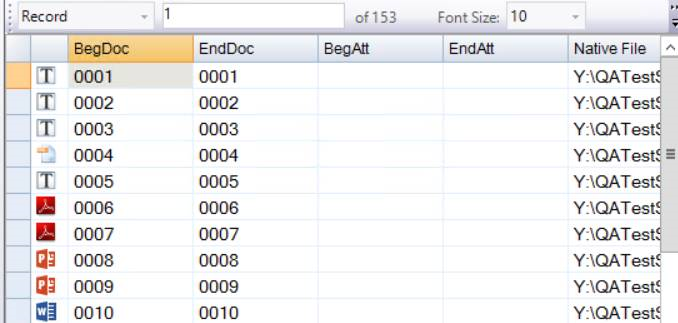
The Case View tab, also know as the Case Grid or Case Table, presents a table (also called a"grid") of documents included in the case. The display of the items in the case view is set up by your administrator when they configure Review. Each record in the case table represents a case document. A subset of case table data displays in search results, Private, or Public Folders in the Case Folders pane on the left.
This topic covers work that you perform on individual documents in the Case View. This includes tasks such as editing fields for the current record, rescanning the current document, and viewing record history.
|
|
Tip: You can also perform case-level in the Case View, such as adjusting the workspace, using the Tally function, and comparing records. For more information on tasks the user can perform when working with all documents in the grid, see Work at the Case-Level in Case View. |
When you first open a case, all case records are included in the table. If you open a review batch, you will see a subset of case records assigned to you or a group to which you belong. All fields for each record, or a subset, may be included. Contact your administrator for details on the data in your cases.
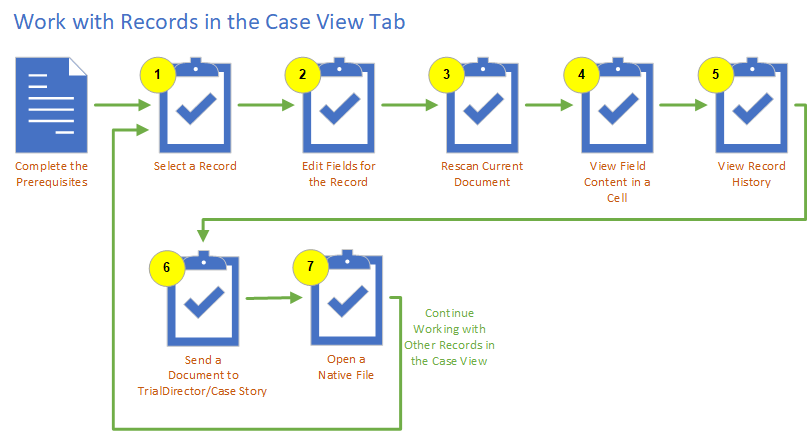
The procedures described in this article explain only some of the many tasks you can complete when working with individual records in the Case View and offer a possible workflow for completing these tasks. This is only an example of a workflow, the tasks can be completed in the order required for your business. The diagram, below, outlines the tasks a user performs when working on individual records.
 Review the Prerequisites
The following table shows the prerequisites that must be in place before you start:
|
Task |
Notes |
|---|---|
|
Create a Case |
Before you being reviewing a case, the case must be created and records must be added to the case, either by scanning hard-copies of items into the case or by importing them from a local or network drive. For more information, seeCreate a Case. |
|
Assign Privileges |
Users must have privileges assigned to review the case. Privileges are complex and control the availability of features in Eclipse SE as well as the users ability to use the features. For more information, see Overview: Security and Control System Access Using Groups, Users, Roles, and Privileges. |
1. Select a Record in the Grid
You need to open Eclipse SE Desktop and select a record in the grid to get started working with individual records.
- Select a record in the grid on the Case View tab.
- To select a single record(s), click the record in the case table. Corresponding documents will appear in the document details pane.
- To select multiple records:
For a contiguous set of records: click the first record of the set, then Shift+click the last record in the set.
For a non-contiguous set of records: click the first record of the set, then CTRL+click the last record in the set.
2. Edit Fields in Case View
If you have been given the required privileges, you can edit fields in the Case View or another tab in the documents pane.
To edit fields in the case table use one of the following methods:
- Copy Content from One Field to the Next
- Copy Content from One Row to the Next
- Copy Data in the Case View/Case Table
- Edit Fields Manually in the Case View/Case Table
If you have the appropriate privileges, you can also edit Pick Lists and Named Lists in Case View. For more information, see Edit Pick or Name Lists in Case View.
For a list of keyboard shortcuts for Eclipse SE see Ipro Eclipse SE Shortcuts (Quick Reference).
To view a list of limitations to editing in the Case View/Case Table, see Editing Limitations in Case View.
Copy Content from One Field to the Next
To copy data for a single field:
-
In the case table, organize columns and rows as needed to copy the needed data from one field to the next.
-
Locate and double-click the field to be changed to match the field in the previous row. (The field in the previous row must not be empty.)
-
Press the F6 key. The content in the field will change to match that of same field in the previous row.
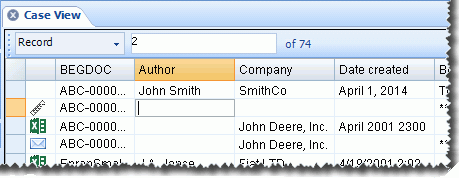
In the following figure, the Author field in the second row will be changed to “John Smith” (matching the field in the first row) after F6 is pressed.
-
Click another field or press the Tab key (or Shift+Tab) to complete the edit and navigate to the next (or previous) field in the row and continue editing.
-
Repeat these steps to copy data into other fields.
|
|
TIP: Instead of double-clicking in a field, you can click the field and press the F2 key or right-click and select Toggle Edit Mode. |
|
|
NOTE: Pressing the F6 key will change a selected field’s content whether it is empty or has content.
|
Copy Content from One Row to the Next
Complete the following steps to copy data from one row to the next.
|
|
NOTE: Empty fields currently displayed in the case table are the only ones that will be changed. They will be filled with data from the previous row. |
-
Locate and double-click any field in the row to be changed to match the one above it.
-
Press the F7 key. All empty fields in the selected row will change to match the corresponding fields in the previous row. In the following example, if the F7 key had been pressed, then the Author, Company, and Date created fields (and any other empty fields currently in the row) would have been changed to match the first row.
-
Click another field or press the Tab key (or Shift+Tab) to complete the edit and navigate to the next (or previous) field in the row and continue editing.
-
Repeat these steps for other rows.
|
|
TIP: Instead of double-clicking in a field, you can click the field and press the F2 key or right-click and select Toggle Edit Mode. |
Edit Fields Manually in the Case View/Case Table
To edit fields manually in the Case View/Case Table:
-
Locate the field to be changed. Continue with any of the following steps, depending on the type of field.
-
Text fields:
-
Double-click the field and enter or edit the value as needed.
-
Press the Tab key (or Shift+Tab) to complete the edit and navigate to the next (or previous) field in the row and continue editing. Alternatively, use other keyboard shortcuts to navigate in the table or stop editing.
-
-
Date fields: Check with your administrator regarding requirements for date fields; enter or correct dates as instructed. Note:
-
To edit a date field, double-click the field and enter or correct the date. Follow the guidelines below; Eclipse SE will change your entry (if needed) to match the format defined for the case.
-
To enter dates without delimiters, use the yyyymmdd format. For example, 20110309 is March 9, 2011.
-
To enter dates with delimiters, use the date format defined for your case. For example, the format might be mmddyyyy – use that format with a delimiter of your choice.
-
If the full date format is being used in your case (such as “March 9, 2014”), enter the full format or the mm-dd-yyyy format (with any delimiter). For example, 03/09/2011.
-
Date ranges defined for coding forms are not enforced when you edit date fields in the case table.
-
Partial dates may not be allowed. For example, if the date format is mm-dd-yyyy and partial dates are not allowed, entering only the month and year will be considered invalid. Likewise, if a DATE_TIME field does not include a time, it will be considered invalid.
-
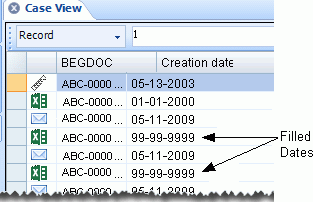
Your administrator may configure Eclipse SE to fill empty or partial dates with zeroes or nines. These can serve as a visual cue for missing or partial dates. In the following example, 9’s have been used to fill empty or partial dates.
-
Press the Tab key (or Shift+Tab) to complete the edit and navigate to the next (or previous) field in the row and continue editing. Alternatively, use other keyboard shortcuts to navigate in the table or to stop editing.
-
-
Category fields: If a field is of the CATEGORY type and includes a control list, complete step 7. If the field does not include a control list:
-
Double-click the field and enter or edit the value as needed.
-
Press the Tab key (or Shift+Tab) to complete the edit and navigate to the next (or previous) field in the row and continue editing. Alternatively, use other keyboard shortcuts to navigate in the table or to stop editing.
-
-
Pick or name lists: Select an item from the dropdown arrow in the field. In some cases you can select multiple items. Users with appropriate privileges can edit the items in the list or add additional values. See Edit Pick or Name Lists in Case View.
-
Repeat steps as needed to edit other fields. When you finish editing, press the F2 key.

|
TIPS: In the following steps, instead of double-clicking a field, you can click the field and press the F2 key or right-click and select Toggle Edit Mode. Also, this procedure assumes you are not already in Edit mode. If you are already in Edit mode, access a field by tabbing to it in the row you are editing or using other Case View keyboard shortcuts. |
Editing Limitations in Case View
There are some differences between editing in Record View and editing in Case view. The following list provides specific information about editing fields in the case table:
- Spell-checking is not implemented in the case table. If field have been configured with the spell-check option, it may be better to edit the field in Record View, where spelling errors will be identified.
- Fields with view-only security cannot be edited (except by Super or Case Administrators).
- Rules may defined for coding forms requiring specific actions be taken regarding field editing and/or tagging. If these rules exist, edit fields in Record View.
- If a change is made that conflicts with unique or defined information (for example, changing the value of a primary field to one that already exists), the change will not be saved. In this event, an error message will display.
- The following field types are automatically populated. Manual edits are allowed, but certain actions will cause edits to be overwritten (for example, if the Case Data Summary Report is run in Eclipse SE Administration). Check with your administrator before editing these fields:
- BEGATTACH
- ENDATTACH
- FILE_EXT
- FILE_ID
- NATIVE_SIZE
- IMAGECNT
- TEXT_SIZE
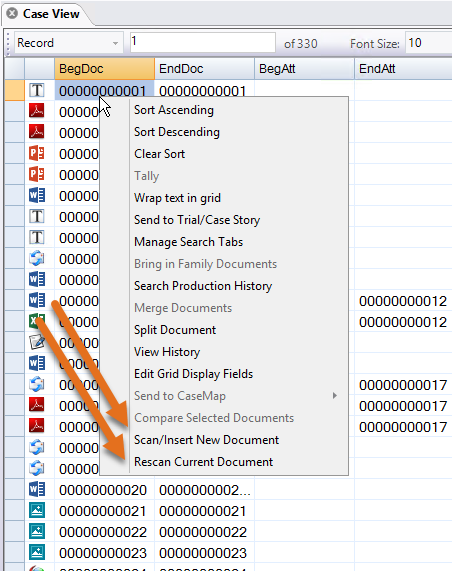
3. Rescan Current Document
Complete the following procedures to rescan a document into a case from the case table (Case View or related tab). See Overview: Scanning (Case Table) for more information about scanning from the Case Table.
When you rescan a document there are two steps, the scanning step and the verification step. Click the links below for more information.
Rescan a Document
-
To replace an existing document, locate the document, then right-click it and select Rescan Current Document.

-
If you are replacing the pages of an existing document and it has images, click Yes in response to the confirmation message. The pages and all applied tags, redactions, etc. will be deleted.
-
Complete the Scan Document dialog box as explained in the following table.
Item
Description
Select Scanner
Select the scanner to be used and basic scan settings. Available items depend on the capabilities of your scanner.
Sides
Color
Paper Size
Rotate Images*
Select this option to rotate all pages in the document set by 90, 180, or 270 degrees. Rotation is common for certain types of documents, such as spreadsheets or graphs.
OCR While Scanning*
Select this option if you will be creating OCR text. The OCR language is English. (If another language is needed, use the Scanning module instead of this “quick scan” method. See Overview: Scanning for more information on the Scanning module.)
BegDoc
Displays the image key to be used for the new document:
-
If you are adding a new document, this is the number following the last image key (BEGDOC) in the case.
-
If you are replacing an existing document, this is the image key of the selected document.
New documents only:
-
If the number is acceptable, leave it as-is.
-
To change the image key, enter the needed number in the BegDoc field.

NOTE: Do not click the Refresh button,
 , unless you want to retrieve the number following the last image key in the case.
* Changes/corrections can be made after the document is scanned, as explained in Check/Add Newly Scanned Documents.
-
-
Click Scan and wait as the document pages are scanned.
-
If you need to add one or more pages to the existing document (for example, if you are using a single-feed scanner):
-
Add the new page(s) to the scanner.
-
Check/change the settings in the left pane of the dialog box.
-
Right-click the page below which you want to add more pages and select Insert Scanned Image(s).
-
- After the new pages are added, respond to the message, “Insert More Pages?” as follows:
- If more pages need to be inserted, add them to the scanner and click Yes to continue.
If you have no additional pages to scan, click No.
NOTE: The message in this step will be repeated each time pages have been scanned; click Yes until no more pages are to be added; then click No.
-
When all pages have been scanned, check/correct them and add them to your case as described in Check/Add Newly Scanned Documents.
Check/Add Newly Scanned Documents
To check the newly scanned documents, make corrections, and add them to your case:
-
Right-click anywhere in the Case View tab and click Scan/Insert New Document.

-
In the Scan Document dialog box, check the list of pages. If pages are missing, add them as explained in Rescan a Document.
-
If OCR was supposed to be added, check the OCR indicator for each page. It should be Y. If OCR is missing, add it as follows:
-
For a single page, right-click the page and select Ocr Current Page.
-
For all pages in the document, right-click anywhere in the list of pages and select Ocr Entire Document.
-
Wait as OCR text is created. When the OCR process starts and is in progress, the OCR indicator is Q. When the process completes, the indicator changes to Y.
-
For each page that was OCR’ed, click the OCR tab and examine the result.
-
-
Click the first page in the list of pages and examine the image, using the scanning image toolbar.
-
Continue with the following steps as needed.
-
To rescan pages:
-
Load the needed pages into the scanner.
-
Select the needed pages in the Scan Document dialog box. For multiple pages, Shift+click or Ctrl+click pages to select a contiguous or non-contiguous set, respectively.
-
Right-click and select Rescan Image(s). Wait as the pages are rescanned.
-
-
To delete pages (such as blank pages):
-
Select the needed pages in the Scan Document dialog box. For multiple pages, Shift+click or Ctrl+click pages to select a contiguous or non-contiguous set, respectively.
-
Right-click and select Delete Image(s).
-
Check the number of selected images; if it is correct, click Yes in response to the confirmation message.
-
-
When scanned pages are complete and correct, click Done to add them to your case.

For information about adding new documents to the case, see Scan a New Document into a Case.
4. View Field Content in a Cell
All information in a particular field may not be visible, in which case the information is truncated and ends with an ellipsis.
To view field content that is truncated, take any of the following actions:
-
Right-click anywhere in the case table and select Wrap text in grid. All content will display in multiple lines. Row size will be as large as necessary to display all content. (Select this menu item again to limit each row to a single line.)
Tip: If you don’t want to wrap text, point to a field with truncated content to view a tooltip containing the complete content.
-
In the case table, change column size, visibility, and/or order.
-
Make the case table area larger by changing the workspace layout.
-
Use Record View. For more information, see Work in Record View.
5. View Record History
A summary of actions taken on a particular document (history) is maintained, including:
-
Changes to case data
-
Addition, removal of document and page tags
-
Addition, removal, and changes to redactions and other annotations
-
Creation of new images using the Quick View tab’s Tiff-on-the-Fly feature
To view this history:
-
In Case View or another tab in the documents pane, right-click the needed record and select View History.
-
Review the report in the View History dialog box. Note:
-
Scroll to see all details and/or maximize the report window.
-
Click a column heading to sort by that column.
-
-
Take the following actions if needed:
-
To save the History Report to a comma-delimited (.CSV) file, click Export to CSV and complete the Save As dialog box.
-
To copy report data and paste it directly into a spreadsheet file such as Microsoft Excel, use common keyboard selection and copy/paste commands.
-
When finished viewing history, click Close.
To view history details on multiple records, see Generate and Export a History Report .
6. Open a Native File
Native files are the electronic source documents, such as email files, Microsoft® Word files, and other files, upon which the documents in your case are based.
If your case includes native files, they are identified in the case table by a native file icon in the leftmost column of the table. Each icon represents the type of file, such asfor email files.
It may be useful for you to open a native file for viewing, for example, if a TIFF image file is fuzzy.
|
|
Note: You will be able to open native files if you have been given the privilege and you have the needed software program on your computer. |
To open a native file using the native application, make sure you have the native application. Then follow these steps:
-
In the Case View or other tab (search results, etc.) in the documents pane, select the needed record.
-
In the leftmost column, double-click the native file icon corresponding to the selected record. For example, the icon for an email file is
 .
. -
Examine the file contents as needed. Perform activities allowed by the native application, such as saving or printing the file. Do not attempt to change the file.
-
When finished, close (do not save) the native file.
|
|
Note: If Eclipse SE cannot find the software program needed to open the file, a Windows message will ask you to either allow the Windows Web service to find the program, or select it yourself. If you receive the Windows message, select a method for locating the program and click OK. |
|
|
Note: If you lack the native file privilege or do not have the appropriate programs, you can view native files in the Quick View tab. Quick View includes a file viewer that will display all common file types. SeeView a File on the Quick View Tab. |
Related Topics
Overview: Case View/Case Table
Last Revision: 6/2/2023
Version: 2019.0.0